Survival Is A Lifestyle19/10/2015 Survivalism and Prepping are no longer hobbies, the trends have grown into lifestyles. With 1.72% of the population now stocking inventory and obtaining survival skills. This statistic is .72% larger than the size of the number of Servicemembers serving in the United States Armed Forces.
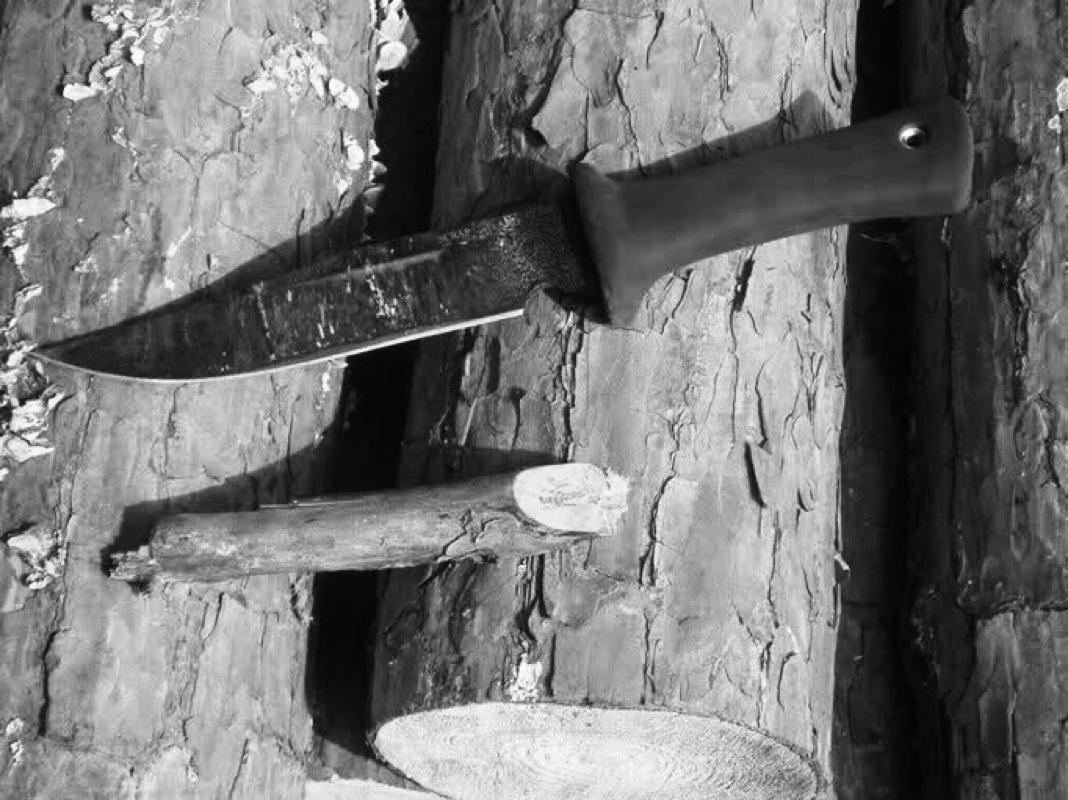
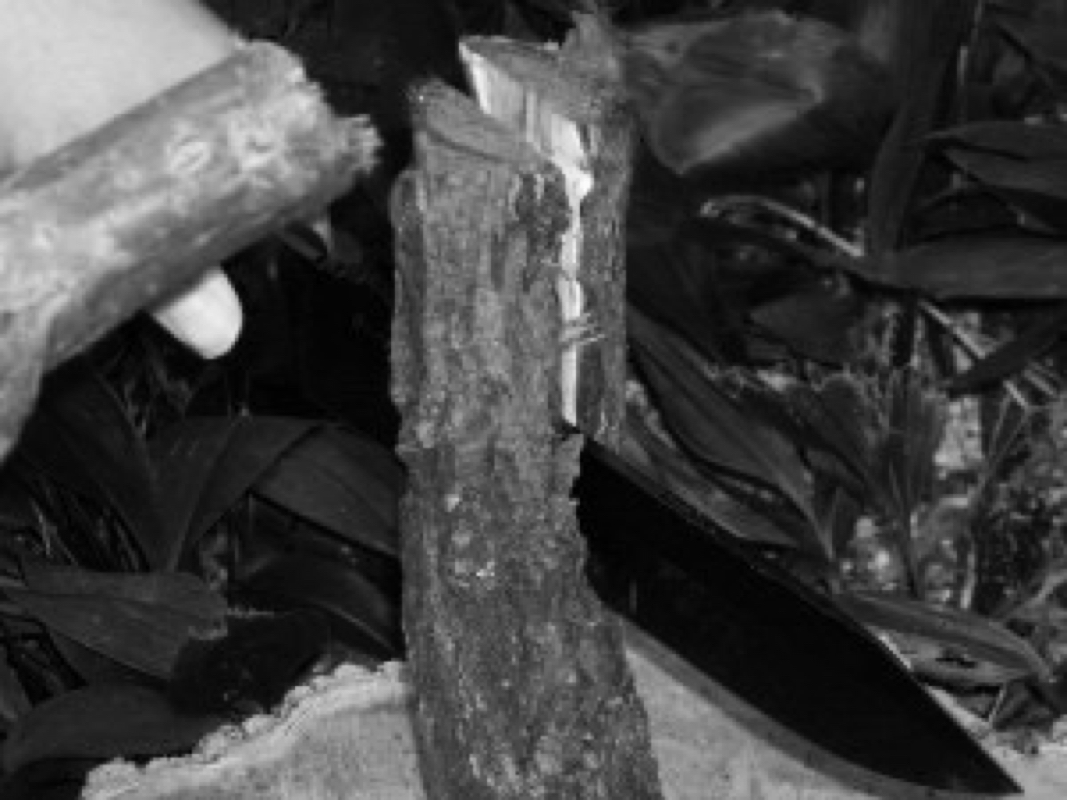
Follow Daniel Shrigley as he teaches you how to STAY ALIVE and puts the odds of survival in your favor. From film, literature, interviews, magazine articles to radio Dan has become a icon in both the Survival and Prepper industries. Known globally by faithful followers Dan has touched the lives of people and has become known as a survival encyclopedia and wealth of knowledge. Batoning And Wedge Splitting19/10/2015 SELECTING A KNIFE First you should select a knife that is durable. A fixed blade knife is best for using in most cases outdoors. You'll want a steel fabricated knife that is temper treated. When it comes to knives it really all comes down to comfort and use. In this case a fixed blade knife serves a better purpose and can take the abuse of being hammered on using the batoning method. You will also want a blade that is not serrated. BATONING A knife is a great tool to use for splitting wood. It offers control for precision cutting while conserving energy. Some people use the batoning method and some do not. However the technique is good if you find that you need to rely on it. I use this method and stand by it's useful purpose. The concern to others is that it dulls or potentially damages the blade. Really the only way to maintain a knife is to keep it sharp and know its limits. Yes there is a risk to damage, that's why I suggest having a sturdy, durable knife. If you practice this method you will become proficient with the technique and this will help to limit breaking or chipping the blade. First step is selecting the wood that you will use to club with on the back side of the blade. Ensure the surface is smooth and has the correct thickness and weight to hammer down with on the back edge. When selecting the wood that you are about to baton, avoid knots and joints in the wood. Always remember safety first with proper eye protection. The last thing anyone needs is flying debris to get in your eyes. You want to keep your knife perpendicular to your body and the ground. Also before you come down with full force ensure the blade of the knife is set in the wood first. Batoning is a great way to make a fire board or hearth. Additionally kindling for fire for creating coals that will burn larger pieces of dry wood. This method is not to replace using an axe, however if you do not have an axe this is a good alternate. Avoid splitting wood down the center and work on removing strips of wood. This will put less wear and tear on your knife. WOODEN WEDGE
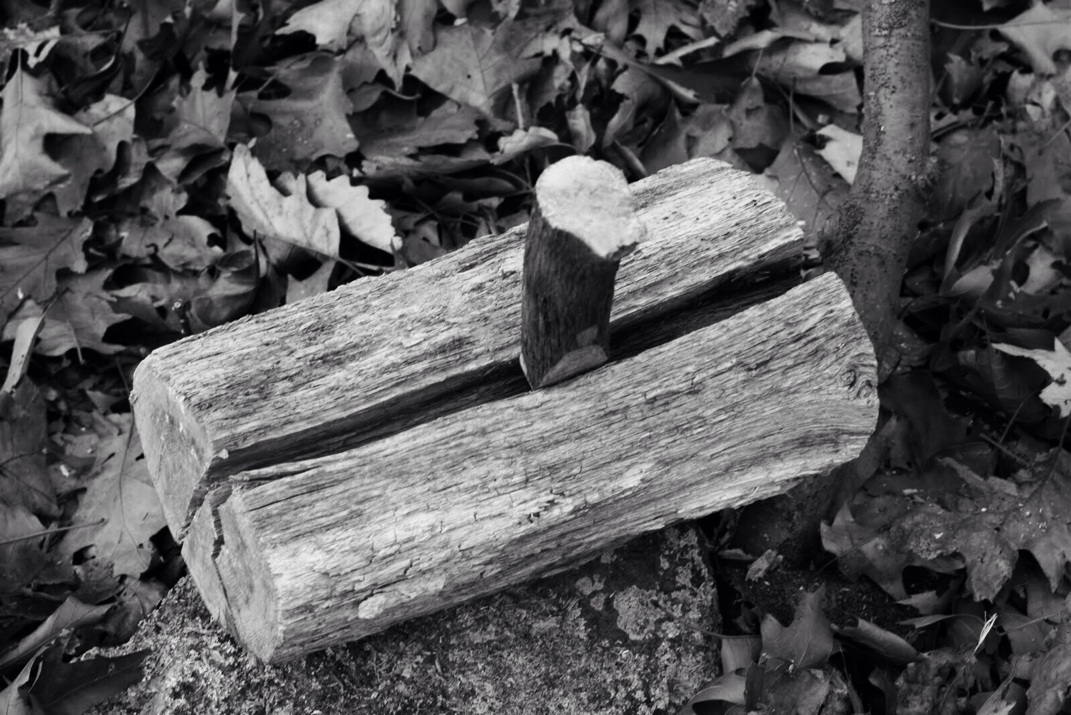
Using a wooden wedge to split wood with is a good way to conserve your knife. All you need to do is carve a hard wood into the shape of a wedge. Then you baton the wedge down a log that has a natural split or crack. This method will not work on green wood or freshly cut wood from a living tree. You'll want to stick with dead, dry wood. Woods rich with resin will also be harder to split with a wooden wedge. SURVIVING ON A DESERTED ISLAND13/10/2015  Survivalist Daniel W. Shrigley Survivalist Daniel W. Shrigley As a result of shipwreck or getting separated from a group, you find yourself stranded on an island. Surviving is your focus and only consideration. You do not have to be an experienced outdoorsman, in order to take basic steps that will help keep you alive until rescue arrives. Finding water is one of the top priorities and fundamentals of survival. You will want to find fresh drinkable water that can be boiled and/or filtered if possible. Always treat water before consumption while in the outdoors. If you must drink water without treating it first, look for pools or puddles of rainwater that's fresh and collected on rocks or smooth surfaces. Drinking water is crucial to your survival. You can survive by drinking water, consuming very little food, plants, fish, insects, reptiles, muscles, seaweed, coconuts, and small game animals. Water is needed to digest foods. Also water help regulate your core temperature. NEVER DRINK SALT WATER! Stream or springs are great sources to seek out. Running water is always a better option. Sometimes locating water sources proves to be difficult. You set up water collection devices to help create an artificial source. Use any containers you can find to collect rainwater or morning dew; each day, your hat or shoes can work as collection devices. A solar still is another way of collecting condensation water, build a still by digging a hole. Place a can or other capture device in the bottom and surrounding the container with wet natural materials such as green grass, leaves or wet sand. Put a piece of plastic or vinyl material over the hole and weight it down with rocks; put a single small rock in the center to weigh it down, forming a cone or funnel shape. Water will collect and drip into the container. Shelter When selecting a shelter spot within your survival camp, look around the island for places that shield you from the elements of location and weather; if you have found fresh water, put your shelter within reasonable hiking distance. Also look for natural materials that are close to camp the enhance the shelter. You want your shelter to shield you from the sun, wind, rain, ocean spray, blowing sand. Also put the shelter far enough on the beach to avoid high tide. Take whatever watercraft you have that brought you to the island and lean it on one side to build a hasty shelter. You can lean it up on it's side against a tree or rocks. Also remember to tie down your raft or boat to avoid damage or drifting in currents. Another option is a lean-to shelter. Use what nature provides, place tall branches against a solid base and covering them with leafy branches to create a wall that will keep out water, wind and sun. It's a good idea to build your shelter on or in view of the beach so you can run out quickly to signal passing boats or planes. Food Food is critical for energy and survival. You must be careful about what you eat. Insects, lizards, fish, bananas, coconuts provide protein and calories. With fish you can lay them to dry in the sun. Often rodents are in abundance on deserted islands and offer lots or protein and energy. Insects are edible and offer three times the protein than red meats. Plants are also a great food source, however very dangerous if you eat the wrong poisonous types. You MUST BE POSITIVE YOU PROPERLY IDENTIFIED THE PLANT, before consumption. Learn the plant edibility test and steps. UNIVERSAL PLANT EDIBILITY TEST STEPS: 1. Avoid ever having to use this method without careful planning. Some plants can be deadly, and even if you follow these guidelines perfectly, there is always a chance that a plant will make you seriously ill. Prepare yourself for wilderness outings by learning about the local flora and fauna, and carry a guidebook or taxonomic key to help you identify plants. Even if you are unprepared and cannot find food you know to be safe remember that, depending on your activity level, the human body can go for days without food, and you're better off being hungry than being poisoned. 2. Find a plant that is plentiful.You don't want to go through the rigorous process of testing a plant if there's not a lot of it to eat. 3. Abstain from eating or drinking anything but purified water for 8 hours before the test.(If you have to use this method, this step will probably be unavoidable.) 4. Separate the plant into parts.Some plants have edible parts and poisonous parts. In order to test if a plant is edible, you must separate it into the leaf, stem and root and test each part separately for edibility. After you have separated the plant into parts, inspect each part you are preparing for parasites. If you encounter worms or small insects inside the plant, discontinue the test with that sample and consider seeking a different sample of the same plant. Evidence of worms, parasites or insects indicates that the plant is rotten, especially if the organism has vacated the plant. Many parts of plants are only edible during certain seasons (for example, acorns collected after the fall are usually rotten). If you find grubs inside the plant, the plant is rotting, but the grubs are edible and contain high amounts of protein (although they taste sour and are gritty). 5. Find out if the plant is contact-poisonous. A contact-poisonous plant is one that causes a reaction merely by touching your skin. Rub the selected plant part on the inside of your elbow or wrist. Crush it so that the sap touches your skin, and hold it there for 15 minutes. If the plant causes a reaction in the next 8 hours, do not continue testing that part of that plant. Do this with each part of the plant until you find a part that isn't contact-poisonous. 6. Cook a small portion of the plant part. Some plants are poisonous only when raw, so it's a good idea to cook the plant part you are testing if possible. If you can't cook the plant or if you don't anticipate that you will be able to cook it in the future, just test it raw. 7. Test the plant in your mouth.This portion of the test is where things get dangerous, so proceed very slowly and carefully. Take the following steps to test the plant in your mouth: Hold a small portion of the prepared plant part against your lip for 3 minutes. Do not put the plant in your mouth. If you notice any burning, tingling, or other reaction, discontinue testing. Place another small portion of the plant part on your tongue. Hold the plant on your tongue without chewing for 15 minutes. Discontinue testing if you notice any reaction. Chew the plant and hold it in your mouth for 15 minutes. Chew the plant well, and do not swallow. Discontinue testing if you notice any reaction. Swallow the small portion of plant. 8. Wait 8 hours. Do not eat or drink anything during this period except purified water. If you feel sick, immediately induce vomiting and drink plenty of water. If activated charcoal is available, take that with the water. Discontinue testing if you experience any adverse reaction. 9. Eat 1/4 cup of the same kind of plant part prepared the same way. It is critical that you use exactly the same part of exactly the same kind of plant, and that you prepare it in exactly the same way as you did the initial sample. 10. Wait an additional 8 hours.Abstain from any other food except purified water. Induce vomiting immediately as above if you should feel ill. If no reaction has occurred, you may assume only that particular part of the plant is safe to eat, and only as prepared during the test. 11. Begin a new test, if the plant part you have chosen fails any of the tests. If the first plant part you choose appears contact-poisonous, you may immediately test a new plant on your other arm or behind your knee. If the plant causes a reaction before you have swallowed it, wait until the symptoms have disappeared before testing a new plant. If you have an adverse reaction after you've swallowed the plant, wait until symptoms have disappeared and start a new test. Although there may be edible parts of the plant you initially chose, it is preferable to move on to a different plant for subsequent tests. 12. Do a gradual test if you have other food sources. If you are in a situation where you have access to other sources of safe food, you can incorporate this test into your diet more gradually by splitting it up into 3 stages, and using your 8 hours of normal sleep as the 8 hours of pre-test for each stage. Again, this should only be used if you are in a survival situation (e.g. your existing food rations are running low, and you need to start testing another source before your current one is depleted) or if you cannot find documentation for a particular plant and are willing to undergo the risks (poisoning and death) involved. Wake up and do the contact-poisonous part of the test. After 8 hours, eat a normal meal (not of the plant under test). Next morning, complete the test up to swallowing a single piece. After 8 hours, assuming you are still alive and well, eat a normal meal again. Eat the full sample of the plant under test on the 3rd morning. After 8 hours, celebrate life and the adding of a new edible plant to your experience by eating a nice meal. Don't disregard any other steps, or tips, or warnings; this alternative method is only to save your body from the stress of 24 hours of fasting, and enables you to continually test new plants in your area without going hungry for more than 16 hours a day, and only 8 hours on the final day, assuming 1/4 cup of the food can sustain you. FOOD (Cont.) Simply by sharpening a stick to spear fish or make your fishing pole. You can use string, shoelaces, strands of a rope, or tendons otherwise known as sinew of an animal. You can use traps and snares as well. Look for recognizable fruits first, like coconuts or plantains. You can also safely eat ants (make sure they are dead first), grubs and grasshoppers. Don't risk your life eating questionable berries, mushrooms or plants. Rescue Fire and smoke are great signal devices. Fire on the highest elevated and open are; if you know where the shipping lanes pass, put your fire in the most visible spot. When you see a ship or a plane, you can create big amounts of smoke by tossing on slightly damp moss or branches. Create several fire piles that you can light quickly. To attract attention from the air, arrange rocks that contrast with the sand into a very large pattern that would not occur in nature. You can also root around on the island for materials that will reflect the sun and use them to signal passing aerial vehicles and watercraft.  Well like any survival situation you begin with the basics. First you prepare by having accountability of personnel or family members. Develop a escape plan with a centralized meeting spot. In case of fire you develop a designated escape route. Crouch but don't crawl to evacuate from a fire. Never touch a doorknob with bare hands in a house fire. You don't know how hot the door nob might be. Cover your mouth with a damp cloth if possible. In case of earthquake or tornado you will develop a plan that identifies the strongest most centralized location in your home. If available retreat to a reinforced shelter or underground shelter in case of tornado. In case of flood seek high ground and stick to locations that allow for easy rescue. If possible evacuate the area before the flood arrives. Obey warnings from emergency management offices or authorities. So having a reactionary plan to implement that's practiced and refined to perfection. Safety is your greatest concern. Living through the event is the priority. Next step is recovery and accountability. Get 100% accountability of all personnel or members. Render aid to those in need if at all possible without risking further injury or loss of life. Notify authorities and call for help only if damage, injury, death occurred or if rescue is needed. Beware of broken natural gas lines and down power lines assume all are live and deadly. Notify utility emergency services immediately. Mark with a bright colored signal or sign to alert others to avoid the area. Water, food, blankets, first aid kits, flashlights that are charged and back up batteries on hand. If possible use electronics that are crank generated. Crank radio on hand in case of phone failures. List of phone numbers for service provides. Enough water per person to last no less than 7 days typically. Practice water conservation and use ration control with H2o and food. Chem-lights, fire striker(s), road flares, area maps, tents, shelf stable foods, dry foods and canned foods. Pocket knives, compasses, thick trash bags 72 gallons or larger, bleach, rope and cordage, tarp(s), firewood, extra fuel stored in a approved storage container. Zip lock sealable plastic bags. Rags and sterilized bandages to include tourniquet(s). You'll want a emergency supply of over the counter medicine or relief aids. Also back up supply of prescription drugs and eyewear. All members are recommended to attend a Red Cross approved CPR class. To avoid predicted disasters it's important to adhere to the advice of passed through media outlets and emergency services. Often people place material possessions at such a high value that they risk their own safety to protect property. If you're told to evacuate it's determined that to avoid great bodily injury or death it's best to leave. It's important to be prepared, the above recommended items are a baseline to begin with, you can add too or take away what suits your needs best. Your emergency kits should provide necessity for sustainment, minimal comforts, communications and signal. The best way to survive is to beat the elements. In the cold proper clothing attire, in the heat proper sun protection and artificial shade, wind and water protected clothing and shelters. You need to remember that preparing is all about the event and or conditions. Learn historical seasonal data about your location to best prepare. Nothing beats knowledge and common sense. Safety is the number one concern. Like they say in the US Army, everyone is a safety officer and if you see an unsafe act you're obligated to sound off and put a halt to it. Sometimes life throws curve balls at you. It's how you swing back, that determines a strike, base hit or home run. Being prepared and educated is a Major League decision. You improve your odds of survival by taking simple measures that improve your chances to live. Take a survival class, learn CPR, obey warnings. It's so easy a caveman could, well you know. Archives
June 2023
|
All Rights Reserved, Copyright © 2012 - 2022 Survival Extreme Catalog Inc. All Rights Reserved, Copyright © 2012 - 2022 Survival Trek Escape. All Rights Reserved, Copyright © 2012 - 2022 Survival Talk Radio.


